RainLoop 是一个用 PHP 创建的现代电子邮件客户端。它非常轻巧,不会消耗太多资源。它支持 IMAP 和 SMTP,并提供具有多种功能的用户友好界面。
在 Ubuntu 20.04 LTS Focal Fossa 上安装 RainLoop Webmail
apt步骤 1. 首先,通过在终端中运行以下命令,确保所有系统包都是最新的。
sudo apt update
sudo apt upgrade
步骤 2. 安装 LAMP 堆栈。
需要 Ubuntu 20.04 LAMP 服务器。如果您没有安装 LAMP,您可以在此处按照我们的指南进行操作。
步骤 3. 在 Ubuntu 20.04 上安装 AbanteCart。
首先,在您的 webroot 目录中为 RainLoop 创建一个目录:
sudo mkdir /var/www/rainloop
cd /var/www/rainloop
默认情况下,RainLoop 在 Ubuntu 20.04 基础存储库中不可用。现在我们运行以下命令从官方源下载最新版本的 RainLoop Webmail 脚本安装程序:
sudo wget -qO- https://repository.rainloop.net/installer.php | sudo php
我们将需要更改一些文件夹权限:
sudo chown -R www-data:www-data /var/www/rainloop
sudo chmod -R 755 /var/www/rainloop
步骤 4. 为 RainLoop 配置 Apache VirtualHost。
现在我们在 Apache 中创建一个新的虚拟主机指令。例如,在您的虚拟服务器上创建一个名为 ' ' 的新 Apache 配置文件:rainLoop.conf
sudo nano /etc/apache2/sites-available/rainloop.conf
添加以下文件:
<VirtualHost *:80>
    ServerAdmin admin@your-domain.com
    ServerName your-domain.com
    ServerAlias www.your-domain.com
    DocumentRoot /var/www/rainloop/

    <Directory />
        Options +Indexes +FollowSymLinks +ExecCGI
        AllowOverride All
        Order deny,allow
        Allow from all
        Require all granted
    </Directory>

    <Directory /var/www/rainloop/data>
        Require all denied
    </Directory>

    ErrorLog /var/log/apache2/rainloop_error_log
    TransferLog /var/log/apache2/rainloop_access_log
</VirtualHost>
保存并关闭文件,然后重新启动 Apache 网络服务器以进行更改:
sudo a2enmod rewrite
sudo a2ensite rainloop.conf
sudo systemctl restart apache2
步骤 5. 设置 HTTPS。
我们应该在 PrestaShop 上启用安全的 HTTPS 连接。我们可以从 Let's Encrypt 获得免费的 TLS 证书。从 Ubuntu 20.04 存储库安装 Let's Encrypt 客户端(Certbot):
sudo apt install certbot python3-certbot-apache
接下来,运行以下命令以使用 Apache 插件获取免费的 TLS 证书:
certbot --apache -d your-domain.com
您将被要求提供您的电子邮件并接受服务条款:
Enabled Apache rewrite module
Redirecting vhost in /etc/apache2/sites-available/rainloop.conf to ssl vhost in /etc/apache2/sites-available/rainloop-le-ssl.conf

- - - - - - - - - - - - - - - - - - - - - - - - - - - - - - - - - - - - - - - -
Congratulations! You have successfully enabled https://your-domain.com

You should test your configuration at:
https://www.ssllabs.com/ssltest/analyze.html?d=your-domain.com
- - - - - - - - - - - - - - - - - - - - - - - - - - - - - - - - - - - - - - - -

IMPORTANT NOTES:
 - Congratulations! Your certificate and chain have been saved at:
   /etc/letsencrypt/live/your-domain.com/fullchain.pem
   Your key file has been saved at:
   /etc/letsencrypt/live/your-domain.com/privkey.pem
   Your cert will expire on 2022-06-11. To obtain a new or tweaked
   version of this certificate in the future, simply run certbot again
   with the "certonly" option. To non-interactively renew *all* of
   your certificates, run "certbot renew"
 - If you like Certbot, please consider supporting our work by:

   Donating to ISRG / Let's Encrypt:   https://letsencrypt.org/donate
   Donating to EFF:                    https://eff.org/donate-le
如果测试成功,请重新加载 Apache 以使更改生效:
sudo apache2ctl -t
sudo systemctl reload apache2
步骤 6. 配置防火墙。
默认情况下,在 Ubuntu 上启用了 UFW 防火墙。根据您的 Apache 虚拟主机配置文件,打开端口 80 和 443 以允许 HTTP 和 HTTPS 流量:
sudo ufw allow 80/tcp
sudo ufw allow 443/tcp
sudo ufw reload
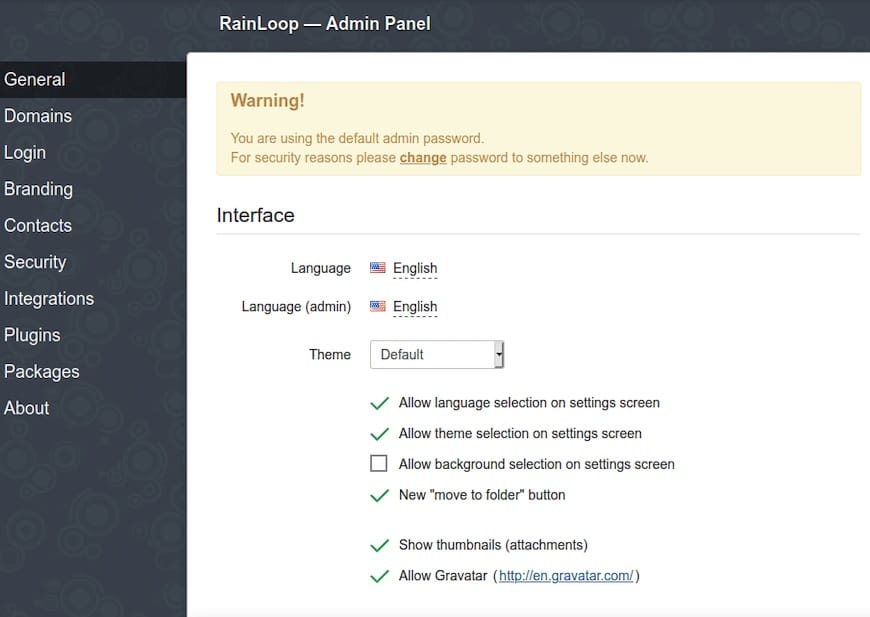
步骤 7. 访问 RainLoop Webmail Web 界面。
成功安装后,打开 Web 浏览器并使用 URL 访问 RainLoop Web 界面。默认管理员登录凭据为:https://your-domain.com
Username: admin
Password: 12345
您应该看到以下页面:

感谢您使用本教程在 Ubuntu 20.04 LTS Focal Fossa 系统上安装 RainLoop Webmail。如需更多帮助或有用信息,我们建议您查看RainLoop 官方网站。


