DeepSeek 系列模型因拥有“更低的成本、更强的性能、更好的体验”三大核心优势,在全球范围内备受瞩目。
本次,我们为大家提供了在统信 UOS 服务器版 V20(AMD64 或 ARM64 架构)上本地离线部署 DeepSeek-R1 模型的攻略,以帮助您顺利完成 DeepSeek-R1 模型部署。
注:(1)部署前,请保证 BaseOS、AppStream、PowerTools、Plus、os 和 everything 源均可用。
(2)部署时,若找不到对应的安装包或对操作步骤有疑问,请联系我们。
单机部署
Ollama+DeepSeek+OpenWebUI
Step 1:防火墙放行端口
执行如下命令,在防火墙中开放 11434 和 3000 端口。
firewall-cmd  --add-port=11434/tcp  --permanent
firewall-cmd  --add-port=3000/tcp  --permanent
firewall-cmd  --reload
注:11434 端口将用于 Ollama 服务,3000 端口将用于 OpenWebUI 服务。
Step 2:部署 Ollama
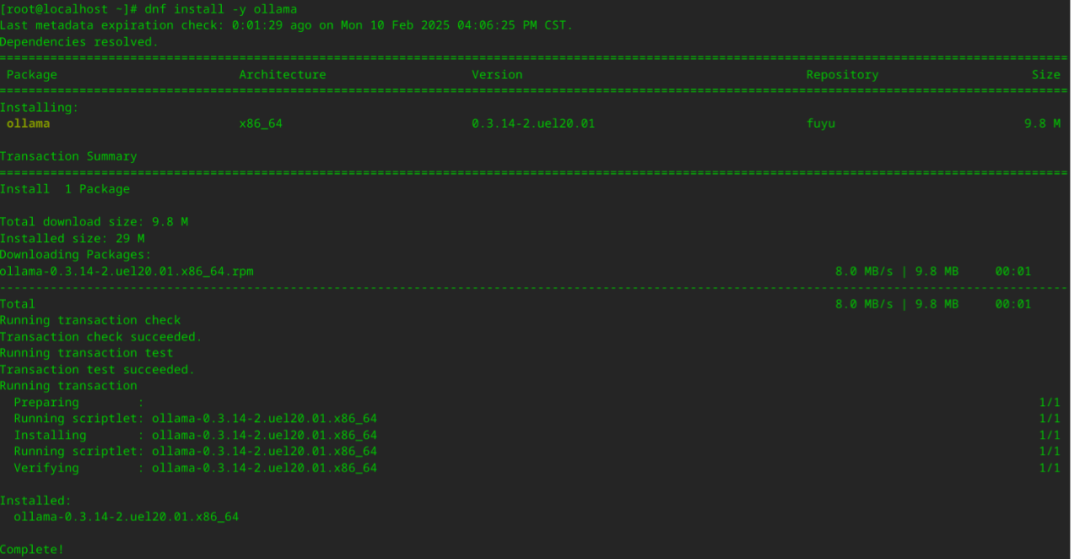
1、执行 dnf install -y ollama 命令,安装 Ollama 软件包。

2、在
/usr/lib/systemd/system/ollama.service
服务配置文件中的 [Service] 下新增如下两行内容,分别用于配置远程访问和跨域请求:
Environment="OLLAMA_HOST=0.0.0.0"
Environment="OLLAMA_ORIGINS=*"
3、执行 systemctl daemon-reload 命令,更新服务配置。
4、执行 systemctl enable --now ollama 命令,启动 Ollama 服务。
Step 3:拉取 DeepSeek-R1 模型
执行 ollama pull deepseek-r1:1.5b 命令,拉取 DeepSeek-R1 模型。

注:1.5b 代表模型具备 15 亿参数,您可以根据部署机器的性能将其按需修改为 7b、8b、14b 和 32b 等。
Step 4:部署 OpenWebUI
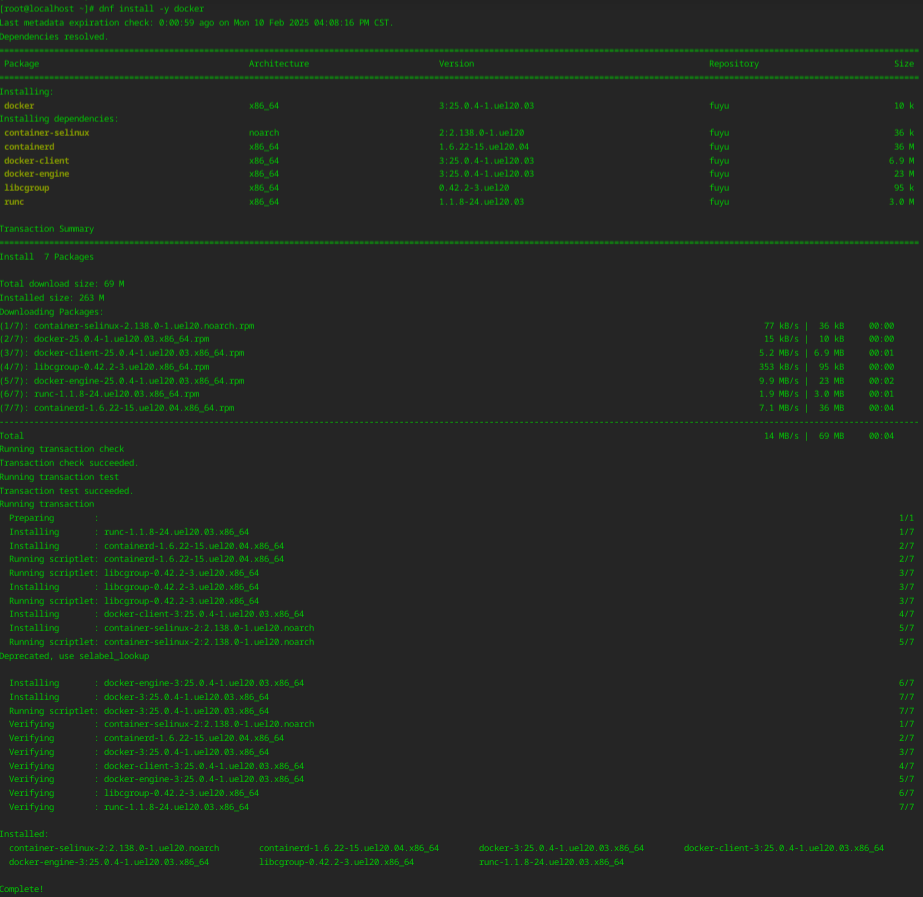
1、执行 dnf install -y docker 命令,安装 docker。

2、执行 systemctl enable --now docker 命令,启动 docker 服务。
3、执行如下命令,运行 OpenWebUI。
docker run -d -p 3000:8080 --add-host=host.docker.internal:host-gateway -v open-webui:/app/backend/data--name open-webui --restart always ghcr.io/open-webui/open-webui:mainStep 5:通过浏览器访问交互界面
1、打开浏览器,访问 http://IP:3000。其中,您需将 IP 替换为部署机器的实际 IP 地址。
2、登录交互界面。请注意,首次访问交互界面时,需要先注册一个账号。
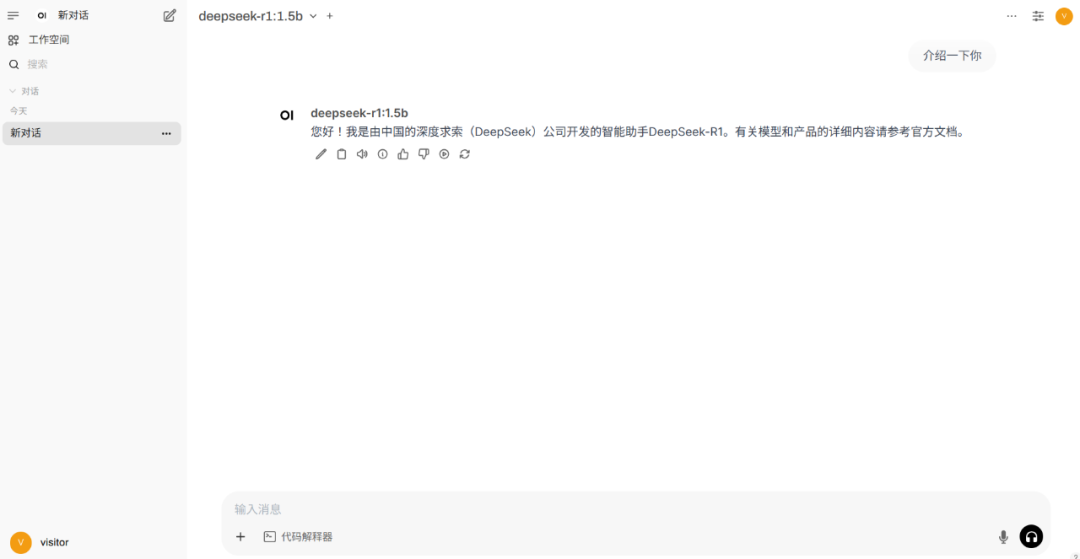
3、在界面左上角,选择 deepseek-r1:1.5b 模型后,输入消息即可开始对话。

集群部署
Kubernetes + KubeRay + vLLM + FastAPI
Step 1:创建 Kubernetes 集群
1、使用 kubeadm 工具,并将 containerd 作为容器运行时,创建Kubernetes 集群。
注:下文以创建一个包含 1 个控制平面节点、1 个 CPU 工作节点(8 vCPUs + 32GB memory)和 2 个 GPU 工作节点(4 vCPUs + 32 GB memory + 1 GPU + 16GB GPU memory)的 Kubernetes 集群为例进行介绍。
2、安装 NVIDIA 设备驱动 nvidia-driver、NVIDIA 容器工具集 nvidia-container-toolkit。
dnf install -y nvidia-driver nvidia-container-toolkit3、配置 nvidia-container-runtime 作为 containerd 底层使用的低层级容器运行时。
nvidia-ctk runtime configure --runtime=containerd
systemctl restart containerd
4、在 Kubernetes 上部署 GPU 设备插件。
kubectl create -f https://raw.githubusercontent.com/NVIDIA/k8s-device-plugin/v0.17.0/deployments/static/nvidia-device-plugin.yml5、执行 kubectl get nodes 命令,获取 2 个 GPU 工作节点的节点名字,并为 GPU 节点设置污点。
kubectl taint nodes <gpu节点1名字> gpu=true:NoSchedule
kubectl taint nodes <gpu节点2名字> gpu=true:NoSchedule
Step 2:编写Ray Serve应用示例(vLLM 模型推理服务应用)
请基于 ray-ml 官方镜像,添加 vLLM,并配置 Ray 和 vLLM。
应用程序将使用 vLLM 提供模型推理服务,通过 Hugging Face 下载模型文件,并通过 FastAPI 提供兼容 OpenAI API 的 API 服务。
注:下文中提到的 registry.uniontech.com/uos-app/vllm-0.6.5-ray-2.40.0.22541c-py310-cu121-serve:latest 为打包好的 Ray Serve 示例应用的容器镜像。
Step 3:在 Kubernetes 上创建 Ray 集群
1、安装 KubeRay。
#安装Helm工具
dnf install -y helm
#配置Kuberay官方Helm仓库
helm repo add kuberay https://ray-project.github.io/kuberay-helm/
#安装kuberay-operator
helm install kuberay-operator kuberay/kuberay-operator --version 1.2.2
#安装kuberay-apiserver
helm install kuberay-apiserver kuberay/kuberay-apiserver --version 1.2.2
2、执行 kubectl get pods 命令,获取 kuberay-apiserver 的 pod 名字,例如 kuberay-apiserver-857869f665-b94px,并配置 KubeRay API Server 的端口转发。
kubectl port-forward <kubeary-apiserver的Pod名> 8888:88883、创建一个名字空间,用于驻留与 Ray 集群相关的资源。
kubectl create ray-blog4、向
http://localhost:8888/apis/v1/namespaces/ray-blog/compute_templates
分别发送带有如下两个请求体的 POST 请求。
注:每个 Ray 集群由一个头节点 Pod 和一组工作节点 Pod 组成。
Ray 头节点 Pod:
{
    "name": "ray-head-cm",
    "namespace": "ray-blog",
    "cpu": 5,
    "memory": 20
}
Ray 工作节点 Pod:
{
    "name": "ray-worker-cm",
    "namespace": "ray-blog",
    "cpu": 3,
    "memory": 20,
    "gpu": 1,
    "tolerations": [
    {
      "key": "gpu",
      "operator": "Equal",
      "value": "true",
      "effect": "NoSchedule"
    }
  ]
}
可借助系统里的 curl 命令发送请求:
curl -X POST "http://localhost:8888/apis/v1/namespaces/ray-blog/compute_templates" \
     -H "Content-Type: application/json" \
     -d '{
           "name": "ray-head-cm",
           "namespace": "ray-blog",
           "cpu": 5,
           "memory": 20
         }'
curl -X POST "http://localhost:8888/apis/v1/namespaces/ray-blog/compute_templates" \
-H "Content-Type: application/json" \
-d '{
"name": "ray-worker-cm",
"namespace": "ray-blog",
"cpu": 3,
"memory": 20,
"gpu": 1,
"tolerations": [
{
"key": "gpu",
"operator": "Equal",
"value": "true",
"effect": "NoSchedule"
}
]
}'5、向
http://localhost:8888/apis/v1/namespaces/ray-blog/clusters 发送带有如下请求体的 POST 请求。
{
   "name":"ray-vllm-cluster",
   "namespace":"ray-blog",
   "user":"ishan",
   "version":"v1",
   "clusterSpec":{
      "headGroupSpec":{
         "computeTemplate":"ray-head-cm",
         "rayStartParams":{
            "dashboard-host":"0.0.0.0",
            "num-cpus":"0",
            "metrics-export-port":"8080"
         },
         "image":"registry.uniontech.com/uos-app/vllm-0.6.5-ray-2.40.0.22541c-py310-cu121-serve:latest",
         "imagePullPolicy":"Always",
         "serviceType":"ClusterIP"
      },
      "workerGroupSpec":[
         {
            "groupName":"ray-vllm-worker-group",
            "computeTemplate":"ray-worker-cm",
            "replicas":2,
            "minReplicas":2,
            "maxReplicas":2,
            "rayStartParams":{
               "node-ip-address":"$MY_POD_IP"
            },
            "image":"registry.uniontech.com/uos-app/vllm-0.6.5-ray-2.40.0.22541c-py310-cu121-serve:latest",
            "imagePullPolicy":"Always",
            "environment":{
               "values":{
                  "HUGGING_FACE_HUB_TOKEN":"<your_token>"
               }
            }
         }
      ]
   },
   "annotations":{
      "ray.io/enable-serve-service":"true"
   }
}
可借助系统里的 curl 命令发送请求:
curl -X POST "http://localhost:8888/apis/v1/namespaces/ray-blog/clusters" \
     -H "Content-Type: application/json" \
     -d '{
           "name": "ray-vllm-cluster",
           "namespace": "ray-blog",
           "user": "ishan",
           "version": "v1",
           "clusterSpec": {
             "headGroupSpec": {
               "computeTemplate": "ray-head-cm",
               "rayStartParams": {
                 "dashboard-host": "0.0.0.0",
                 "num-cpus": "0",
                 "metrics-export-port": "8080"
               },
               "image": "registry.uniontech.com/uos-app/vllm-0.6.5-ray-2.40.0.22541c-py310-cu121-serve:latest",
               "imagePullPolicy": "Always",
               "serviceType": "ClusterIP"
             },
             "workerGroupSpec": [
               {
                 "groupName": "ray-vllm-worker-group",
                 "computeTemplate": "ray-worker-cm",
                 "replicas": 2,
                 "minReplicas": 2,
                 "maxReplicas": 2,
                 "rayStartParams": {
                   "node-ip-address": "$MY_POD_IP"
                 },
                 "image": "registry.uniontech.com/uos-app/vllm-0.6.5-ray-2.40.0.22541c-py310-cu121-serve:latest",
                 "imagePullPolicy": "Always",
                 "environment": {
                   "values": {
                     "HUGGING_FACE_HUB_TOKEN": "<your_token>"
                   }
                 }
               }
             ]
           },
           "annotations": {
             "ray.io/enable-serve-service": "true"
           }
}'
Step4:部署 Ray Serve 应用
1、执行 kubectl get services -n ray-blog 命令,获取 head-svc 服务的名字,例如 kuberay-head-svc,并配置端口转发。
kubectl port-forward service/<head-svc服务名> 8265:8265 -n ray-blog2、向
http://localhost:8265/api/serve/applications/ 发送带有如下请求体的 PUT 请求。
{
   "applications":[
     {
         "import_path":"serve:model",
         "name":"deepseek-r1",
         "route_prefix":"/",
         "autoscaling_config":{
            "min_replicas":1,
            "initial_replicas":1,
            "max_replicas":1
         },
         "deployments":[
            {
               "name":"VLLMDeployment",
               "num_replicas":1,
               "ray_actor_options":{

               }
            }
         ],
         "runtime_env":{
            "working_dir":"file:///home/ray/serve.zip",
            "env_vars":{
               "MODEL_ID":"deepseek-ai/DeepSeek-R1-Distill-Qwen-1.5B",
               "TENSOR_PARALLELISM":"1",
               "PIPELINE_PARALLELISM":"2",
               "MODEL_NAME":"deepseek_r1"
            }
         }
      }
   ]
}
可借助系统里的 curl 命令发送请求:
curl -X PUT "http://localhost:8265/api/serve/applications/" \
     -H "Content-Type: application/json" \
     -d '{
           "applications": [
             {
               "import_path": "serve:model",
               "name": "deepseek-r1",
               "route_prefix": "/",
               "autoscaling_config": {
                 "min_replicas": 1,
                 "initial_replicas": 1,
                 "max_replicas": 1
               },
               "deployments": [
                 {
                   "name": "VLLMDeployment",
                   "num_replicas": 1,
                   "ray_actor_options": {}
                 }
               ],
               "runtime_env": {
                 "working_dir": "file:///home/ray/serve.zip",
                 "env_vars": {
                   "MODEL_ID": "deepseek-ai/DeepSeek-R1-Distill-Qwen-1.5B",
                   "TENSOR_PARALLELISM": "1",
                   "PIPELINE_PARALLELISM": "2",
                   "MODEL_NAME": "deepseek_r1"
                 }
               }
             }
           ]
         }'
发送请求后,需要一定的时间等待部署完成,应用达到 healthy 状态。
Step 5:访问模型进行推理
1、执行 kubectl get services -n ray-blog 命令,获取 head-svc 服务的名字,例如 kuberay-head-svc,并配置端口转发。
kubectl port-forward service/<head-svc服务名> 8000:8000 -n ray-blog2、向
http://localhost:8000/v1/chat/completions 发送带有如下请求体的 POST 请求。
{
    "model": "deepseek_r1",
    "messages": [
        {
            "role": "user",
            "content": "介绍一下你"
        }
    ]
}
可借助系统里的 curl 命令发送请求:
curl -X POST "http://localhost:8000/v1/chat/completions" \
     -H "Content-Type: application/json" \
     -d '{
           "model": "deepseek_r1",
           "messages": [
             {
               "role": "user",
               "content": "介绍一下你"
            }
           ]
         }'
性能调优
GPU内核级优化
# 锁定GPU频率至最高性能
sudo nvidia-smi -lgc 1780,1780  # 3060卡默认峰值频率
# 启用持久化模式
sudo nvidia-smi -pm 1
# 启用MPS(多进程服务)
sudo nvidia-cuda-mps-control -d
内存与通信优化
# 在模型代码中添加(减少内存碎片)
torch.cuda.set_per_process_memory_fraction(0.9)
# 启用激活检查点(Activation Checkpointing)
from torch.utils.checkpoint import checkpoint
def forward(self, x):
    return checkpoint(self._forward_impl, x)
内核参数调优
#调整swappiness参数,控制着系统将内存数据交换到磁盘交换空间的倾向,取值范围 0 - 100。
echo "vm.swappiness = 10" | sudo tee -a /etc/sysctl.conf


# 调整网络参数
echo "net.core.rmem_max = 134217728" | sudo tee -a /etc/sysctl.conf
echo "net.core.wmem_max = 134217728" | sudo tee -a /etc/sysctl.conf
echo "net.core.somaxconn = 65535"   | sudo tee -a /etc/sysctl.conf


# 然后执行以下命令使修改生效
sudo sysctl -p
核心概念
DeepSeek
DeepSeek 模型是由中国 AI 公司深度求索开发的一款大型语言模型,拥有高效的架构和创新的训练策略。DeepSeek 模型在数学推理、代码生成和知识理解等方面表现突出,可广泛应用于教育培训、内容创作、科研探索等领域。
Ollama
Ollama 是一个基于 Go 语言开发的开源框架,旨在简化大型语言模型的安装、运行和管理过程。它支持多种大型语言模型,如 LLaMA、DeepSeek等,并提供与 OpenAI 兼容的 API 接口,方便开发者和企业快速搭建私有化 AI 服务。
OpenWebUI
OpenWebUI 是一个可扩展的、功能丰富且界面友好的大模型对话平台。它支持多种大型语言模型运行器,包括与 Ollama 和 OpenAI 兼容的 API。
Kubernetes
Kubernetes(简称 K8s)是一个容器编排平台,旨在自动化部署、扩展和管理容器化的应用程序。通过其丰富的 API 和可扩展性设计,K8s 能够支持公有云、私有云、混合云等多种环境,广泛应用于微服务架构、大数据处理、DevOps 及云原生应用等领域。
kubeRay
Ray 是一个通用的分布式计算编程框架,可用于扩展和并行化 AI 应用程序,实现并行化和分布式地处理跨多节点、多 GPU 的 AI 工作负载。KubeRay 是Kubernetes 上托管 Ray 集群和部署 Ray 分布式应用的集成工具集。
vLLM
vLLM 是一个快速且易于使用的库,专为大型语言模型的推理和部署而设计。vLLM 无缝集成 HuggingFace,提供 OpenAI API 兼容的 HTTP 服务,支持 NVIDIA GPU、AMD CPU 和 GPU、Intel CPU 和 GPU、PowerPC CPU、TPU 以及 AWS Neuron 等硬件,支持张量并行和流水线并行的分布式推理。
FastAPI
FastAPI 是一个现代、高性能的 Web API 框架,用于部署提供本地模型的 API 服务。

未来,统信 UOS 服务器版将针对以 DeepSeek 为代表的大模型推理性能进行更多优化,提供更加完善的 OS+AI 解决方案,敬请期待!


